Timesheets In Xero
Xero provides some great time-saving features when it comes to employee payment and leave. You can save yourself a lot of hours normally spent on data entry by inviting your employees and letting them add their own timesheets. Leave requests can also be managed and tracked automatically. The only job left for you as a payroll administrator is to approve the timesheets and upcoming leave requests. Follow the steps below to getting started.
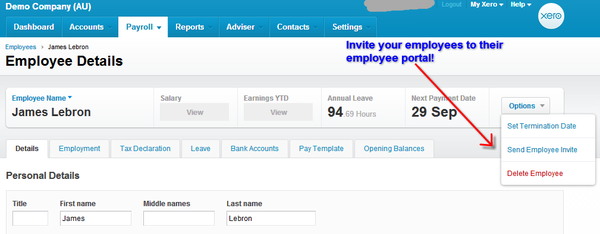
A. Invite your employees!
Invite your employees to the secure employee portal by going to the payroll tab and select “Employees”. Click on your first active employee and then click on the “Options” button from where you then choose “Send employee invite”. Fill in the details and invite them. Their email address will be their login and they create the password themselves the first time they login.
What can they view from being invited as an employee?
The employee can view the following:
*Details (First Name, Last Name, Email and DOB).
*They can apply for leave in the “Leave” tab.
*They can view their payslips.
*They can print their payment summary at the end of year when it has been published by you for them to access in My payroll.
*They can submit timesheets and amend a timesheet that might have been rejected by you.
B. How to get your employees started!
When an employee creates their first timesheet advise them to save their timesheet as a template by clicking on it and selecting “Save as template”. This allows them to re-use it when they are about to submit a new timesheet to you as payroll administrator, and adjust it if needed.
To use a timesheet template that has been saved the employee needs to go to their “My Payroll” and select the timesheet tab, click on the “Add timesheet” and select the period in which they want to submit. The next step is to click on “Continue” and “Load Template”. This then allows them to make any adjustments and submit it to you as payroll administrator.
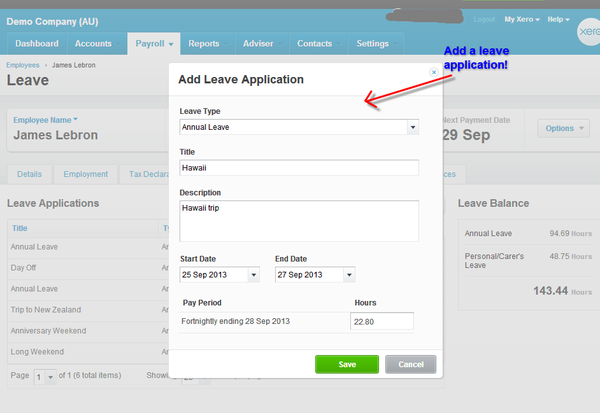
If your employee is about to take leave they will have to send a request leave to you. When they apply for leave make sure they put an all the information that you as a payroll administrator wants and that might be selecting the proper leave that they want to apply for, putting in a description for it and also if they want a full day off or if their is another amount of hours they are applying for. When your employees submit their leave request they can only select full days and so it is important to add any other requests in the information.
C. What do you need to manage as a payroll administrator?
As a payroll administrator remember that the first thing you would check is your payroll settings and your employee cards before inviting the employees so that you have made sure that all is setup in the correct way. Changing from other software to Xero provides you with a good opportunity to go through your payroll data and make sure that you comply with the agreements that you have.
Once this is done you are ready for Xero and the time savings it has for you!
After making sure that all of your data in the payroll section is updated the second step is to show your employees how simple this is for them and that they get an understanding of the process and what you require from them when it comes to due dates for submitting timesheets, leave requests etc.
When your employees has been invited and submit their first timesheet you will get a email notification. You will find that timesheet in “Pending Approval”. If you are happy with the timesheet approve it. If it needs amending reject it and explain in the pop-window the reason as to why it was rejected so that your employee can redo it in the correct way.
If a timesheet has been approved but not processed by you, you can change it into a draft and this works in the same way as above since your employee will get a notification stating that the timesheet has been rejected and that it needs to be re-submitted.
To add someone to back you up for approving leave requests and/or timesheets while you are absent simply give them access by going to the employee card – “Employment” tab and tick the boxes “Authorised to Approve Leave” and ” Authorised to Approve Timesheets”.
Important information!
Remember that if you are using timesheets all “Earnings rates” must have the same time units as the “Ordinary Earnings rate”. An example is if you have setup the “Ordinary Hours” in “Hours” and allowances measured in a “Fixed amount”. If this is the case and you want your employee to be able to add this in timesheet you will need to change the pay item in the payroll settings area to measure in the same way.
If a leave request has been made by any of your employees and approved by you, you will be able to view these hours in the employee payslip when creating your “Pay Run”. These hours will be populated automatically from the employee leave tab.
D. Time to create your first Pay Run!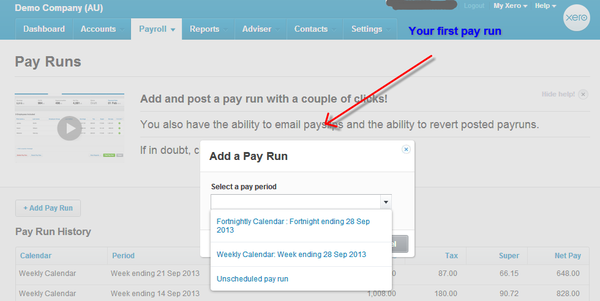
Go to the payroll tab and select “Add Pay Run” and select the period you are about to create.
All of your approved timesheets will now flow across and also any leave requests that you might have approved for the period. Click into each employee if you want to double check their payslip calculation. Feel free to add a payslip message in the overview area and de-select anyone that you don’t want to include in the pay run by clicking on the green button located on the right hand side next to the employee name.
When you are happy with your pay run please click on the “Post Pay Run” button and now your pay run has been created and approved. The next step for you is to click on the “Pay Run Options” and select the “Email Payslip”. By clicking on the “Email Payslip” button, Xero will send a payslip out via email to your employees and also post it in the employee portal. If you are using the ABA file within Xero to make a payment to your employees select “Download ABA” and save to your desktop so that you easily can locate it when logging in to your bank and approving it for payment.
(If your ABA file is comes up with an error, please check the following:
1. The correct bank account is chosen in the “General Setting”- “Payroll Settings”-“General”.
2. That all of your employees have their bank account details filled in the employee card.
3. That you have filled in your “DE user ID” and unticked or ticked the button “Include self-balancing transactions in the ABA file” accordingly to the bank you pay it out from. You find this on the dashboard, clicking on the “Manage button”- “Edit account details”- found in the bottom of page.)
The last step for time savings is to create a “Draft Bill” which will have all the coding to your wages account, your PAYG liability account and your superannuation liability and expense account. Instead of having to do lots of data entry when your bank feeds come across for your wages you simply “Match” the bill with the wages bank feeds. Before you can do this, go to the “Accounts”-“Purchases”- and drafts status to approve the bill! Once the bill is approved Xero allows you to “Match” this with your bank feeds.
(If you have one statement line coming across from the bank with the lump sum from the wages you will find that Xero has pre-matched the bill and you will have to simply press the “OK” button. If you have several statement lines for the employees, select the “Match” button and select the bill and use the “Split” button to add the amount for each statement line to be able to reconcile. Important! If you manually have added a payment from within the bill the “Split” button won’t appear and Xero will only let you match the “Payment” with the bank feed which might create an issue for you! If you have done this delete the payment in the bill and then re-reconcile and select the “Split” button.)
Hopefully these timesheet and leave tips will save you time and help expedite the overall payrun process.
Karin